Nickimouse
<font color=green>I wish I could be Patrick Stewar
- Joined
- Jun 26, 2002
OK, I'm back with a parts list and instructions. I use that term loosely,as this was pieced together by a novice. I'll do my best, and you can post any questions you have. We will do our best to answer them!
Again, this was pieced together and some was sort of jerry-rigged to make it fit.
Parts:
1-12 inch and 2 -6 inch plastic globes. (I'm sure glass would work, we just happened to find plastic ones.)
clear silicone
3 inch PVC schedule 40 pipe (cut to your preferred height) We could only buy in 10 foot stick
2 4x3 reduces (PVC)
1 light socket
1 plug ( for bottom of post for extension cord)
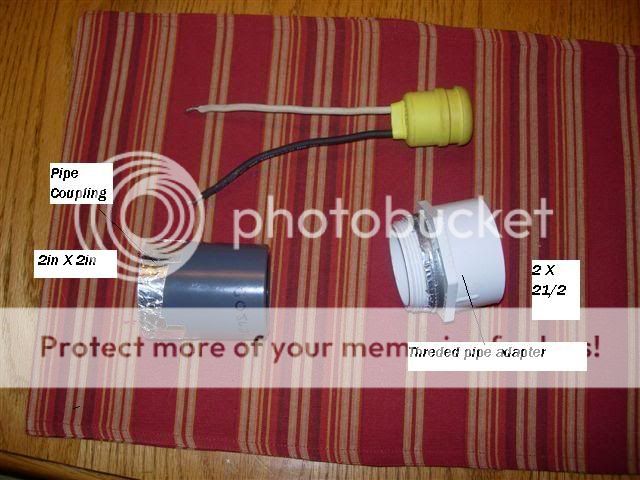
1- 2 x 2 inch pipe coupling ( for Light Socket)
1- 2 X 21/2 in pvc pipe adapter (to hold pipe coupling. the bottom was hexagon shaped and was made to fit tighter with duct-tape)
12-2 electric wire ( or an old Extension cord would work)
Krylon black PVC spray paint
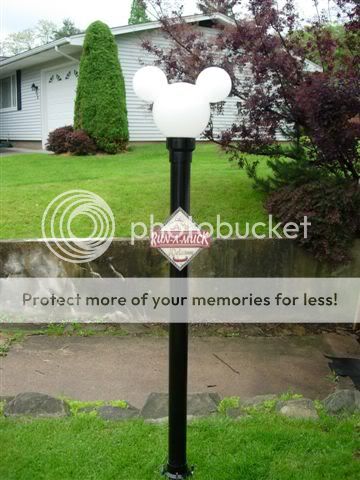
Globes,small holes were cut in the large globe where 6 inch globes were siliconed on. Did this to let more light shine into "ears'.
then silicone one 4x3 reducer(larger end) to bottom of the head. Paint it first.
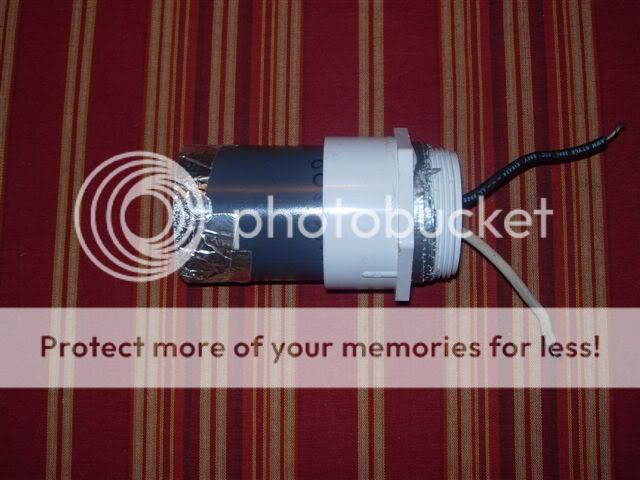
light socket was put in 2 1/2 inch pvc coupler and the coupling inserted into the pipe adapter .this was made to fit in the top of the pole with a little duct tape around the top to make a tighter fit.
Electric cord was connected to socket and run down pole to the connector at the bottom of the pole. A hole was drilled to fit the bottom connector.
other reducer was connected to the bottom, large side down. DH drilled small holes around the bottom and used tent stakes to connect it to the ground. the reducer connected to the head fits right over the top of the pole and is left unglued so we can take it on and off to put the bulb in. it is a tight fit and keeps it weather proof.
.
When you are building this and have questions just ask and I will answer them as best I can.

Again, this was pieced together and some was sort of jerry-rigged to make it fit.
Parts:
1-12 inch and 2 -6 inch plastic globes. (I'm sure glass would work, we just happened to find plastic ones.)
clear silicone
3 inch PVC schedule 40 pipe (cut to your preferred height) We could only buy in 10 foot stick
2 4x3 reduces (PVC)
1 light socket
1 plug ( for bottom of post for extension cord)
1- 2 x 2 inch pipe coupling ( for Light Socket)
1- 2 X 21/2 in pvc pipe adapter (to hold pipe coupling. the bottom was hexagon shaped and was made to fit tighter with duct-tape)
12-2 electric wire ( or an old Extension cord would work)
Krylon black PVC spray paint
Globes,small holes were cut in the large globe where 6 inch globes were siliconed on. Did this to let more light shine into "ears'.
then silicone one 4x3 reducer(larger end) to bottom of the head. Paint it first.
light socket was put in 2 1/2 inch pvc coupler and the coupling inserted into the pipe adapter .this was made to fit in the top of the pole with a little duct tape around the top to make a tighter fit.
Electric cord was connected to socket and run down pole to the connector at the bottom of the pole. A hole was drilled to fit the bottom connector.
other reducer was connected to the bottom, large side down. DH drilled small holes around the bottom and used tent stakes to connect it to the ground. the reducer connected to the head fits right over the top of the pole and is left unglued so we can take it on and off to put the bulb in. it is a tight fit and keeps it weather proof.
.
When you are building this and have questions just ask and I will answer them as best I can.


") ( lowes had them too)
( lowes had them too) I will give a holler back..

")